Raspberry Pi SSH Tunnel: Secure Remote Access From Anywhere
In today's interconnected world, the ability to access your devices remotely is not just a convenience but often a necessity. For Raspberry Pi users, setting up a robust and secure remote access solution is paramount, especially when your device is deployed in a remote location or behind a restrictive network. This comprehensive guide will delve into the world of Raspberry Pi SSH tunnel, exploring various methods to establish secure connections, protect your data, and ensure your Pi is always within reach, no matter where you are.
Whether you're managing a home automation system, a personal server, or an IoT project, understanding how to securely access your Raspberry Pi is crucial. Traditional methods like port forwarding often expose your device to unnecessary risks. This article will equip you with the knowledge to leverage SSH tunneling, a cryptographic method that provides secure and encrypted communication, allowing you to bypass common network limitations like NAT and firewalls while significantly enhancing the security of your remote access to your Raspberry Pi.
Table of Contents
- What is Raspberry Pi SSH Tunneling?
- Why SSH Tunneling is Essential for Raspberry Pi
- Understanding Reverse SSH Tunnels on Raspberry Pi
- Leveraging Cloudflare's Zero Trust for Raspberry Pi Access
- Exploring Dedicated Tunneling Services for Raspberry Pi
- Raspberry Pi Connect: A Convenient Alternative
- Accessing Your Raspberry Pi via SFTP with SSH Tunnels
- Conclusion: Secure Your Raspberry Pi with SSH Tunnels
What is Raspberry Pi SSH Tunneling?
At its core, an SSH tunnel, also known as SSH port forwarding, creates a secure, encrypted connection between a local computer and a remote one, through which other network services can be relayed. For your Raspberry Pi, this means you can securely access its console (via SSH) or other services like VNC from anywhere in the world, even if your Pi is behind a firewall or NAT router that prevents direct incoming connections. The principle behind a Raspberry Pi SSH tunnel is to wrap other network traffic inside an encrypted SSH connection, making it appear as regular SSH traffic and thus often bypassing network restrictions.
Traditionally, to access your Raspberry Pi from a remote network, you might have configured port forwarding on your router. While functional, this method opens specific ports on your home network to the entire internet, significantly increasing your exposure to potential security threats. An SSH tunnel, however, establishes a secure, encrypted conduit, protecting sensitive data and mitigating the risks associated with directly exposing your device to the internet. This cryptographic method is particularly useful when the Raspberry Pi is located in a private network behind a firewall or NAT, preventing direct access from the outside.
Why SSH Tunneling is Essential for Raspberry Pi
The Raspberry Pi, with its versatility and low power consumption, is often used for projects that require remote access, such as home servers, IoT hubs, or remote monitoring stations. However, connecting to these devices from outside your local network can be challenging due to network address translation (NAT) and firewalls. These security measures, while beneficial for protecting your local network, prevent unsolicited incoming connections, making direct remote access difficult.
This is where Raspberry Pi SSH tunnel solutions become indispensable. They offer a secure and reliable way to bypass these restrictions without compromising your network's security. By encrypting your connection, you protect sensitive data that might otherwise be intercepted. Moreover, SSH tunneling allows you to expose SSH or VNC on your Raspberry Pi over the open internet, within a VPN, or using an external service, giving you unparalleled flexibility in how you access and manage your device.
- Joyce My 600 Lb Life Now
- What Is The Rarest Hair Colour
- Iran Gdp 2024 Nominal Usd
- Transaction Support
- Alan Ruck Movies And Tv Shows
Understanding Reverse SSH Tunnels on Raspberry Pi
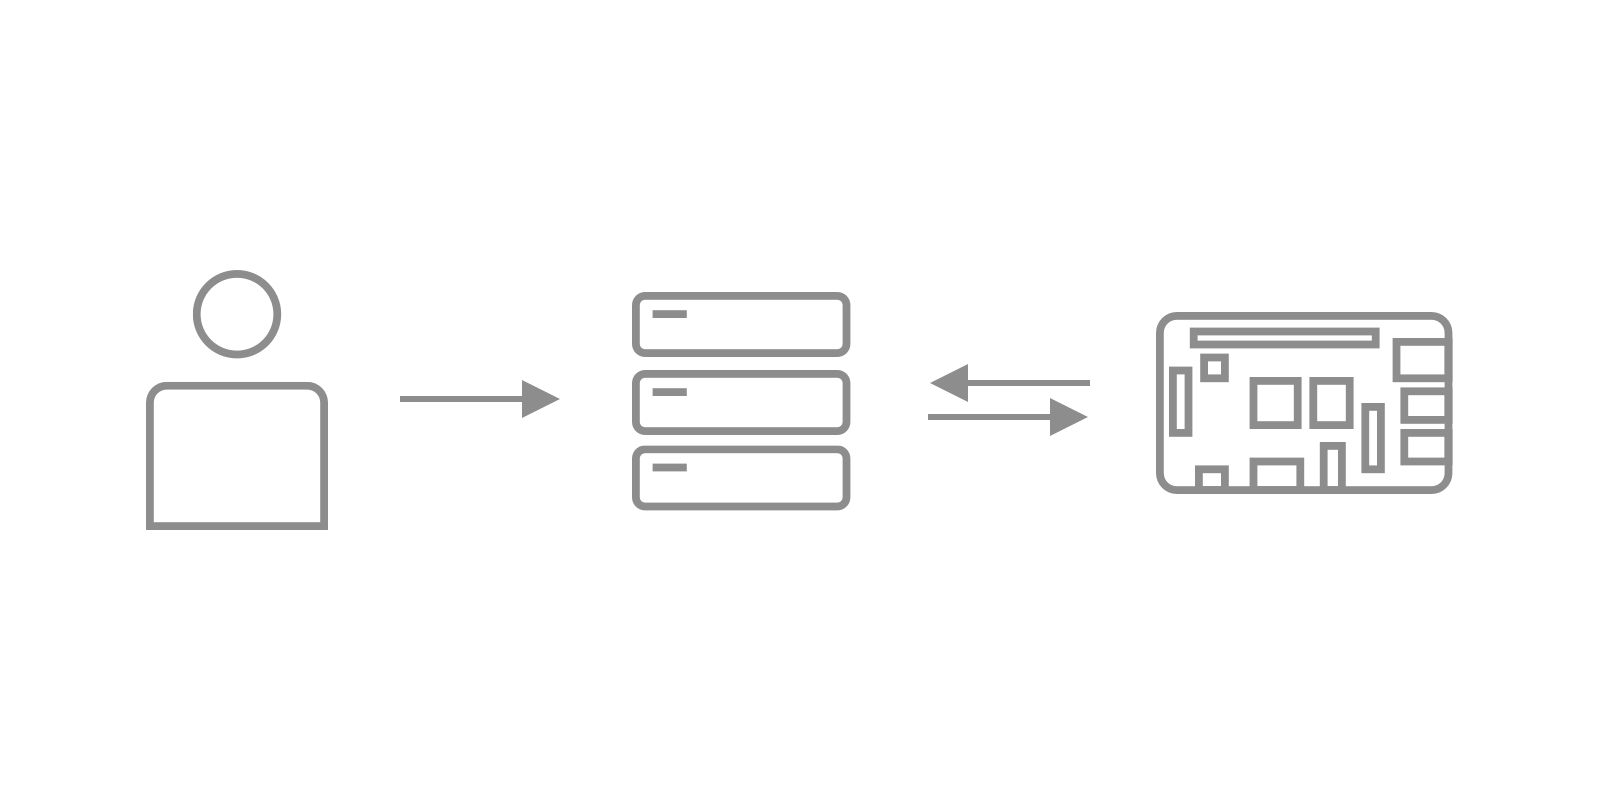
One of the most powerful and commonly used forms of SSH tunneling for Raspberry Pi is the reverse SSH tunnel. Unlike a standard SSH connection where a client connects to a server, in a reverse SSH tunnel, the Raspberry Pi (the client in this scenario) initiates an outbound connection to a publicly accessible server (often referred to as a "jump host" or "command and control server"). This server then acts as a relay, allowing you to connect to the Raspberry Pi through it.
This technique is particularly useful when your Raspberry Pi is behind a NAT or firewall that you cannot configure (e.g., in a university dorm, office network, or mobile hotspot). Instead of the command and control server connecting to the Raspberry Pi, the Raspberry Pi initiates the connection to the command and control server. This is the same technique used by many backdoor programs, highlighting its ability to traverse restrictive networks, but here we leverage it for legitimate and secure remote access.
How Reverse SSH Works
Let's break down the mechanics of a reverse SSH tunnel with a practical example. Imagine your Pi is on your home network, and you have a publicly accessible server (e.g., an EC2 instance, a VPS) with IP 25.25.25.25. The process typically involves the following steps:
- Pi Initiates Connection: The Pi ssh's to the server at
25.25.25.25using a username like “serveruser”. - Remote Port Forwarding: Upon doing so, it's telling that server to open a specific port (e.g.,
2222) on the server's public interface. - Tunnel Establishment: Any connections coming into the server on port
2222are then forwarded over the established SSH tunnel back to the Pi on its local SSH port (usually22). - Access from Anywhere: Once the Pi sets up that remote tunnel, you can then SSH into your Raspberry Pi from anywhere by connecting to the public server at
25.25.25.25on port2222. For example,ssh -p 2222 serveruser@25.25.25.25.
This is correct, you will have the tunnel created anyway. The key here is that the Pi makes an *outbound* connection, which is usually permitted by firewalls, thus creating the "reverse" path for inbound access.
Security Considerations for Reverse SSH
While a reverse Raspberry Pi SSH tunnel significantly enhances security compared to direct port forwarding, it's crucial to implement additional safeguards:
- Strong Authentication: Always use strong SSH keys for authentication instead of passwords.
- Dedicated User: Create a dedicated user on your public server for the Pi's SSH connection with restricted permissions.
- Restrict GatewayPorts: By default, the forwarded port on the public server might be accessible from any IP. You could restrict access to localhost by setting
GatewayPorts noin your server's SSH configuration. That way, only users who are logged into the tunnel server could access the Raspberry Pi via SSH, adding an extra layer of security. - Firewall Rules: Configure firewall rules on your public server to only allow connections to the forwarded port from trusted IP addresses.
Leveraging Cloudflare's Zero Trust for Raspberry Pi Access
For those seeking a more managed and enterprise-grade solution, Cloudflare's Zero Trust platform offers an excellent way to access your Raspberry Pi via SSH or VNC from anywhere in the world without opening any inbound ports on your home network. Cloudflare Tunnel, a component of Zero Trust, creates a secure, outbound-only connection from your Raspberry Pi to Cloudflare's global network.
This approach aligns perfectly with the "Zero Trust" security model, where no user or device is inherently trusted, regardless of their location. It's a comprehensive guide to setting up secure remote access to your Raspberry Pi using Cloudflare Tunnel without port forwarding, eliminating the need for a public jump host and simplifying the setup significantly. This tunnel creates a secure connection to Cloudflare, and your remote access is then brokered through Cloudflare's infrastructure.
Setting Up Cloudflare Tunnel on Raspberry Pi
In this tutorial, you will learn how to set up a Cloudflare Tunnel on the Raspberry Pi. The general steps involve:
- Cloudflare Account: Ensure you have a Cloudflare account and a domain added to it.
- Install Cloudflare Daemon (cloudflared): Install the
cloudflareddaemon on your Raspberry Pi. This small agent establishes the outbound connection to Cloudflare. - Create a Tunnel: Use the
cloudflaredcommand to create a named tunnel and authenticate it with your Cloudflare account. - Configure Tunnel Routes: Define routes within Cloudflare to tell the tunnel where to direct incoming requests. For SSH, you'd typically route a subdomain (e.g.,
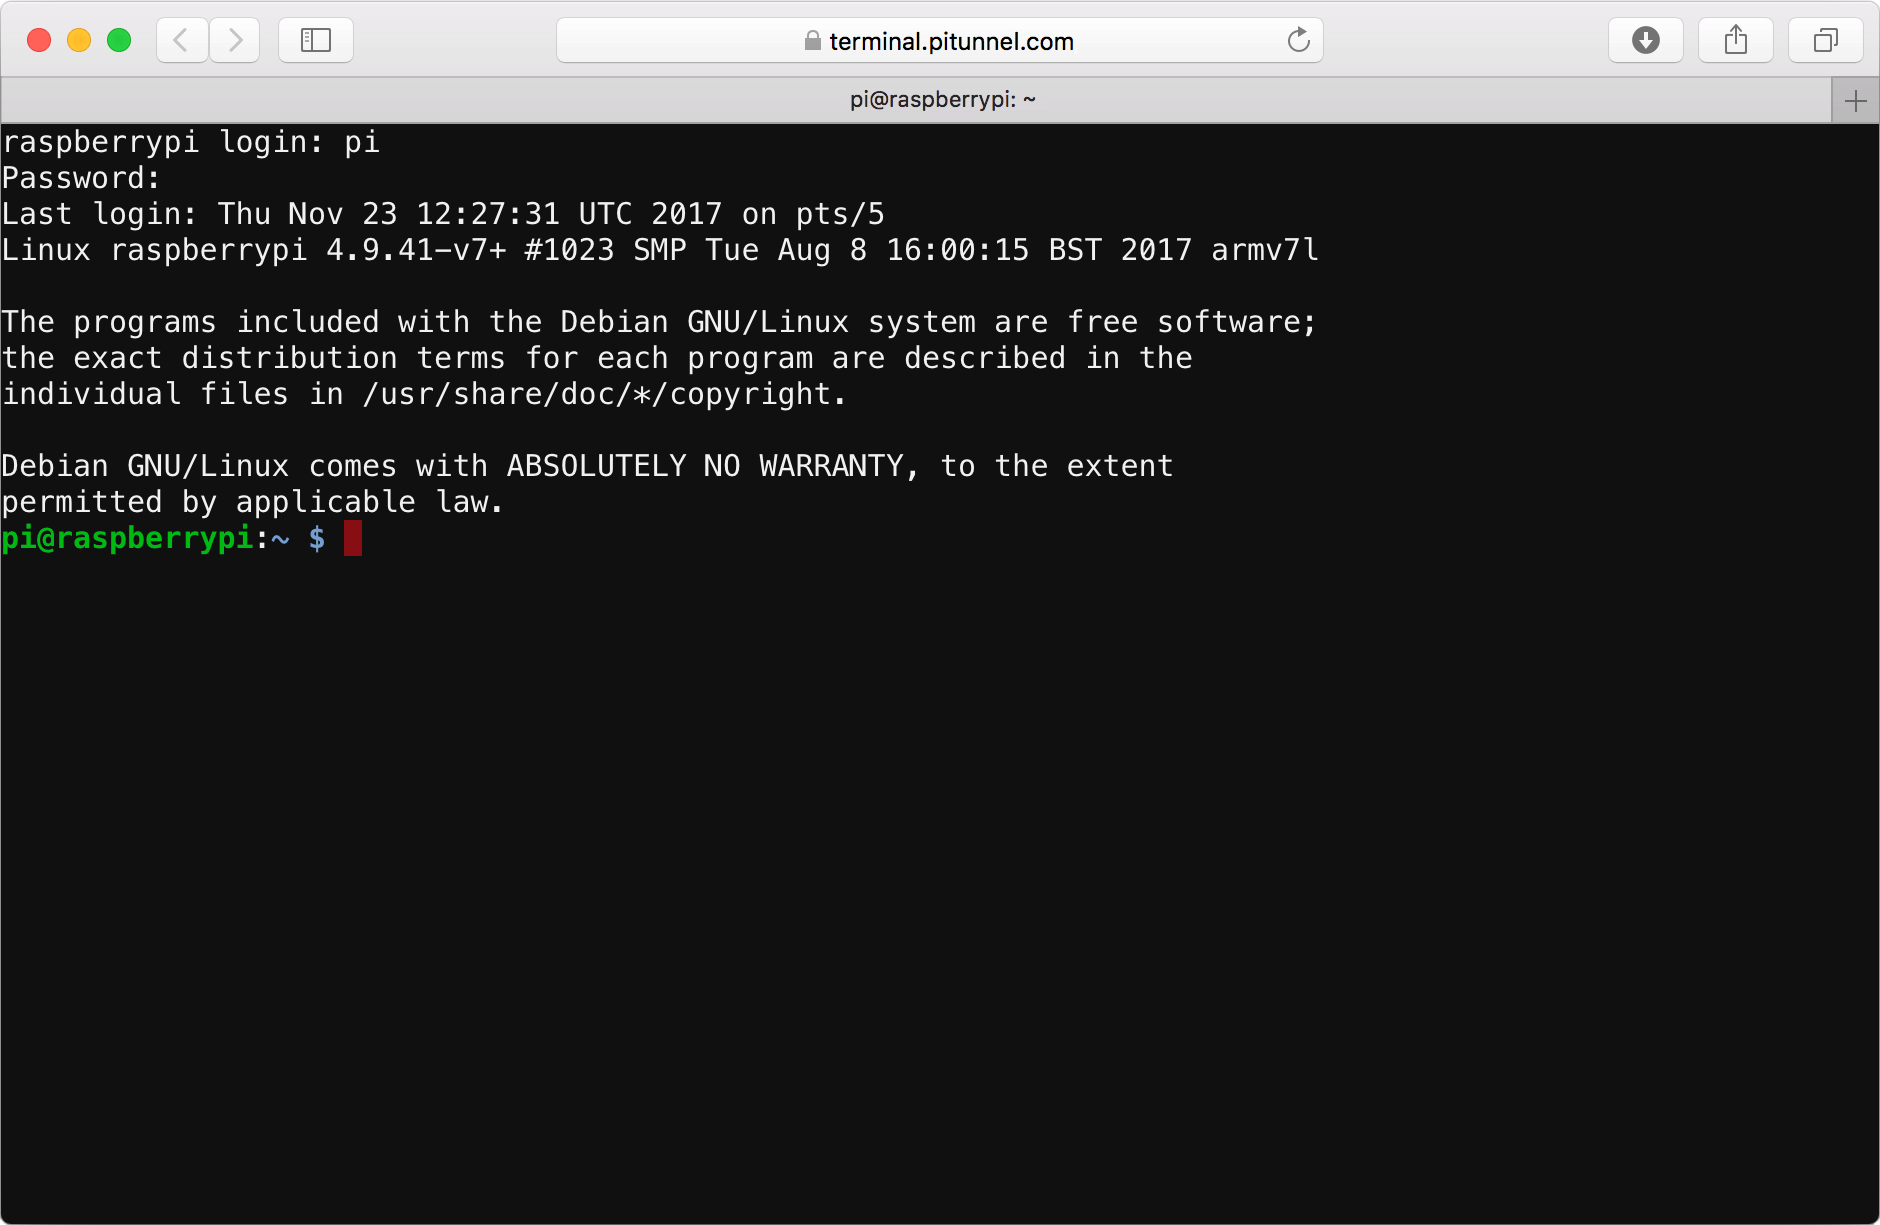
ssh.yourdomain.com) to your Pi's local SSH service. - Access: You can then access your Raspberry Pi using the configured domain name, often through Cloudflare's auditable terminal or even directly via SSH if configured. For instance, one user described setting up a Pi 400 on their home network, using Cloudflare Tunnel to connect it to the Cloudflare network, and then using an auditable terminal to connect to the Pi 400 via Cloudflare and the tunnel using nothing more than a browser.
This method offers robust security features, including identity-based access control, logging, and DDoS protection, making it a highly recommended solution for critical deployments of your Raspberry Pi SSH tunnel.
Exploring Dedicated Tunneling Services for Raspberry Pi
Beyond self-hosted reverse SSH and Cloudflare, several dedicated services simplify the process of creating secure tunnels to your Raspberry Pi. These services often provide user-friendly interfaces, managed infrastructure, and additional features, making them attractive for users who prefer a plug-and-play solution.
Pitunnel.com: Custom Tunnels
Pitunnel.com is an example of a service that provides custom tunnels, allowing you to access your Raspberry Pi SSH through pitunnel.com with an address like pitunnel.com:12345. Custom tunnels are created by entering a command in your Raspberry Pi terminal, simplifying the setup process significantly. This service abstracts away the complexities of managing a public server or configuring intricate network rules. You can contribute to igor47/pitunnel development by creating an account on GitHub, which often indicates community support and ongoing development for such tools.
The main advantage here is simplicity. You don't need to manage a separate server; the service handles the public endpoint and routing for you. This makes it easier to expose SSH or VNC on your Raspberry Pi over the open internet securely.
SocketXP: SSH-Based Reverse Proxy Tunnels
Another prominent service is SocketXP, which provides SSH-based reverse proxy tunnels to remotely access and control Raspberry Pi and IoT devices behind NAT router or firewall. SocketXP, like pitunnel.com, offers a streamlined way to establish secure remote access without manual port forwarding or managing your own public server. They specialize in securely connecting IoT devices, which is a common use case for Raspberry Pis.
These services often come with client software that runs on your Raspberry Pi, initiating the secure connection to their cloud infrastructure. This allows for reliable and secure remote access to your Raspberry Pi SSH tunnel, even in challenging network environments.
Raspberry Pi Connect: A Convenient Alternative
For users looking for an official and integrated solution, Raspberry Pi Connect offers a free screen sharing and remote shell service provided by Raspberry Pi itself. This service aims to simplify remote access for Raspberry Pi users, making it easier to connect to your devices without delving into complex networking configurations. It provides a user-friendly way to access your Pi's desktop environment (screen sharing) and its command line (remote shell).
While not strictly an "SSH tunnel" in the traditional sense, Raspberry Pi Connect achieves similar results by providing secure remote access. It's an excellent option for beginners or those who prefer an officially supported and maintained solution for their Raspberry Pi SSH tunnel needs, especially for general remote management tasks.
Accessing Your Raspberry Pi via SFTP with SSH Tunnels
Beyond just remote shell access (SSH) and graphical interfaces (VNC), SSH tunnels are also crucial for secure file transfer. SFTP (SSH File Transfer Protocol) uses a service on your Raspberry Pi called SSH that allows secure transfer of data. Therefore, before you can use SFTP, you need to enable SSH on your Raspberry Pi and, if accessing remotely, create a tunnel to access SSH through services like pitunnel.com or any other tunneling method discussed.
Once your Raspberry Pi SSH tunnel is established, you can use any SFTP client (like FileZilla, WinSCP, or even command-line sftp) to connect to your Pi through the tunnel. This ensures that all your file transfers are encrypted and secure, protecting sensitive project files, configurations, or data logs. Please follow our guide on SSH sessions and then come back to this article to connect to your Raspberry Pi using SFTP, as the underlying SSH connection is a prerequisite.
Conclusion: Secure Your Raspberry Pi with SSH Tunnels
Remotely accessing your Raspberry Pi doesn't have to be a security nightmare. By embracing the power of the Raspberry Pi SSH tunnel, you can establish secure, encrypted connections that bypass common network restrictions and protect your valuable data. Whether you choose to set up a reverse SSH tunnel to a public server, leverage a robust service like Cloudflare Tunnel, or opt for dedicated solutions like pitunnel.com or SocketXP, the principle remains the same: secure, encrypted communication between your remote machine and your Pi.
Comparing different solutions, using SSH tunneling to expose your Raspberry Pi's SSH to an external machine allows you to access its console from anywhere, significantly enhancing the security of remote access to your Raspberry Pi. By encrypting your connection, you protect sensitive data and mitigate the risks associated with directly exposing your device to the internet. Remember, a secure reverse SSH tunnel is a cryptographic method that allows you to access your Raspberry Pi remotely, providing secure and encrypted communication between two networks. This is particularly useful when the Raspberry Pi is located in a private network behind a firewall or NAT, preventing direct access from the outside.
We encourage you to explore the methods discussed and choose the one that best fits your technical comfort level and specific needs. Secure your IoT devices using secure SSH reverse proxy tunnels, and enjoy the peace of mind that comes with knowing your Raspberry Pi is accessible and protected. Have you tried setting up an SSH tunnel for your Raspberry Pi? Share your experiences and tips in the comments below!
- Whatfinger
- Sotwe T%C3%BCrbanl%C4%B1 T%C3%BCrk
- How To Bypass Deviantart Subscription
- Joan Rivers Brigitte Nielsen
- Godlikeproductions Com

How to SSH Into a Raspberry Pi for Remote Access
SSH tunnel to Raspberry Pi
PiTunnel - Access your Raspberry Pi projects from anywhere
