Master Your Pi Remotely: The Ultimate Guide To Control From Anywhere
The Raspberry Pi, a marvel of miniature computing, has revolutionized countless projects, from home automation to sophisticated robotics. Its versatility is truly remarkable, allowing enthusiasts and professionals alike to build incredible systems. However, to truly unlock its full potential, you often need to control your Raspberry Pi remotely. Imagine managing your smart home server from your office, or troubleshooting an IoT device deployed in a remote location – this is where remote access becomes not just a convenience, but a necessity. This comprehensive guide will walk you through various methods to achieve seamless remote control over your Raspberry Pi, ensuring you can access and manage it from virtually any device, anywhere in the world. Whether you're a seasoned developer or just starting your Raspberry Pi journey, mastering remote connectivity will elevate your projects to an entirely new level of accessibility and efficiency.
In this article, we'll delve into the most effective and secure ways to connect to your Raspberry Pi, exploring both local network solutions and methods for global access. We'll cover everything from the command line power of SSH to the graphical interface of VNC, and even the innovative web-based control offered by Raspberry Pi Connect. Our goal is to provide you with the knowledge and confidence to remotely control your Raspberry Pi with ease, transforming how you interact with your microcomputer and empowering you to tackle more ambitious projects.
Table of Contents
- Why Remote Access? Unlocking Your Pi's Full Potential
- Laying the Foundation: Initial Setup and Network Basics
- Method 1: SSH – The Command Line Powerhouse
- Method 2: VNC – Visual Control from Afar
- Method 3: Web-Based Control with Raspberry Pi Connect
- Beyond the Local Network: Global Access Solutions
- Advanced Considerations and Best Practices
- Conclusion: Your Pi at Your Fingertips
Why Remote Access? Unlocking Your Pi's Full Potential
The Raspberry Pi is an incredibly versatile microcomputer, capable of running a vast array of projects. From acting as a low-power web server, a remote environment sensor, or even an effective network firewall to prevent unwanted intrusions, its applications are nearly limitless. However, physically connecting a keyboard, mouse, and monitor to your Raspberry Pi every time you need to interact with it can be cumbersome and impractical, especially if your Pi is tucked away in a server closet, embedded in a project, or deployed in a remote location. This is precisely where the ability to remotely control your Raspberry Pi becomes invaluable.
- Whatfinger
- Was Usain Bolt Born With That Name
- Cheyenne Swenson Topless
- When Was Fred Astaire Born And Died
- Ekaterina Gordeeva David Pelletier
Remote access liberates your Pi from the confines of physical proximity. It allows users to control their Raspberry Pi from anywhere in the world, making it an incredibly versatile and powerful tool for both hobbyists and professionals. Imagine you're building a smart home system, and your Raspberry Pi is located in a central, out-of-the-way spot. With remote access, you can update its software, check sensor readings, or modify configurations without ever needing to physically touch it. For those involved in IoT (Internet of Things) applications, this capability is critical, as it enables you to control your device from anywhere with an internet connection. Whether you're using a PC, a Linux machine, a Mac computer, or even an Apple/Android phone, the power to manage your Raspberry Pi is literally at your fingertips, opening up a world of possibilities for remote project management and IoT applications.
Laying the Foundation: Initial Setup and Network Basics
Before you can embark on the journey of remotely controlling your Raspberry Pi, a few foundational steps are necessary. These initial configurations ensure that your Pi is ready to accept remote connections and that you understand its place within your network. This groundwork is crucial for a smooth and secure remote access experience.
Enabling SSH on Raspberry Pi OS
Secure Shell (SSH) is a cryptographic network protocol that allows for secure data communication, remote command-line login, and other secure network services between two networked computers. It's the backbone of many remote access methods, and for good reason: it's robust and secure. By default, SSH is often disabled on Raspberry Pi OS for security reasons. To enable it, you have a few straightforward options:
- Gene Wilder Spouse
- Paleseafoam Leaked
- Mark Singer Gorilla Glue Passed Away
- Kaylee Kollion
- The Rookie Where To Watch
- Via Raspberry Pi Configuration Tool (Desktop Environment): If you have a monitor connected, go to the Raspberry Pi desktop, click on the Raspberry Pi icon (menu) > Preferences > Raspberry Pi Configuration. Navigate to the 'Interfaces' tab and ensure 'SSH' is set to 'Enabled'.
- Via `raspi-config` (Terminal): Open a terminal on your Raspberry Pi (or connect via a keyboard/monitor setup). Type `sudo raspi-config` and press Enter. Navigate to 'Interface Options' > 'SSH' > 'Yes' to enable.
- Via an Empty File (Headless Setup): If you're setting up your Pi headless (without a monitor), after flashing Raspberry Pi OS to your SD card, create an empty file named `ssh` (no extension) in the boot partition of the SD card. When the Pi boots, it will detect this file and enable SSH automatically.
Once SSH is enabled, your Raspberry Pi is ready to accept remote terminal access. This is a critical first step for many remote control methods, including SSH itself and some web-based interfaces.
Understanding Your Local Network
To remotely control your Raspberry Pi from another device on your local network, you first need to know its IP address. An IP address is like a street address for your device on the network. Here’s how you can find it:
- On the Raspberry Pi itself: Open a terminal and type `hostname -I` (that's a capital 'i'). This will display your Pi's current IP address.
- Via your Router's Admin Panel: Most routers have a web interface where you can log in and see a list of connected devices, along with their IP addresses. Look for sections like "Connected Devices," "DHCP Clients," or "Network Map."
- Using Network Scanners: Tools like Angry IP Scanner (for desktop) or Fing (mobile app) can scan your local network and list all active devices and their IP addresses.
For consistent remote access, especially on a local network, it's highly recommended to assign a static IP address to your Raspberry Pi. This prevents its IP address from changing every time it reboots or your router renews DHCP leases, saving you the hassle of constantly looking up its new address. You can usually do this through your router's DHCP reservation settings or by configuring the network settings directly on your Raspberry Pi.
Method 1: SSH – The Command Line Powerhouse
SSH, or Secure Shell, is the go-to method for securely accessing the command line of your Raspberry Pi from another computer. It's lightweight, incredibly powerful, and perfect for tasks that don't require a graphical interface, such as running scripts, installing software, managing files, or monitoring system performance. In this Raspberry Pi project, installing an SSH server (which is part of enabling SSH as discussed earlier) will enable us to remotely control the Raspberry Pi using the terminal from another machine. This method is fundamental for anyone looking to gain full control over their Pi's operating system.
SSH allows you to remotely access the command line of the Raspberry Pi from another computer, whether it's a PC, Linux, or Mac. It establishes an encrypted connection, meaning all data exchanged between your computer and the Pi is secure from eavesdropping. This is critical in IoT since you can control your device from anywhere in the world with this technique, provided you set up external access (which we'll cover later).
Connecting via SSH from Different Operating Systems
Once SSH is enabled on your Raspberry Pi and you know its IP address (let's assume it's `192.168.1.100` for this example), connecting is straightforward:
- From Linux or macOS:
Open a terminal (Applications > Utilities > Terminal on Mac, or Ctrl+Alt+T on most Linux distros). Type the following command, replacing `pi` with your Raspberry Pi's username (default is `pi`) and `192.168.1.100` with your Pi's IP address:
ssh pi@192.168.1.100The first time you connect, you might see a warning about the authenticity of the host. Type `yes` to continue. You'll then be prompted for your Raspberry Pi's password (default is `raspberry`). Once entered, you'll have full command-line access to your Pi.
- From Windows:
Modern Windows versions (Windows 10 and 11) come with an SSH client built-in. Open PowerShell or Command Prompt (search for "cmd" or "powershell" in the Start menu). The command is the same as for Linux/macOS:
ssh pi@192.168.1.100If you're on an older Windows version or prefer a dedicated client, PuTTY is a very popular and free SSH client. Download and install PuTTY, then open it. In the 'Host Name (or IP address)' field, enter your Pi's IP address. Ensure the 'Port' is `22` (the default for SSH) and 'Connection type' is 'SSH'. Click 'Open'. A terminal window will appear, prompting you for your username and password.
With SSH, you can remotely control your Raspberry Pi from a PC, Linux, or Mac computer and even transfer files using secure copy (SCP) or SFTP (SSH File Transfer Protocol), which are built on top of SSH. For instance, to copy a file from your computer to your Pi:
scp /path/to/local/file.txt pi@192.168.1.100:/home/pi/This command copies `file.txt` from your local machine to the `/home/pi/` directory on your Raspberry Pi. SSH is the fundamental tool for command-line access and is indispensable for advanced users.
Method 2: VNC – Visual Control from Afar
While SSH is excellent for command-line operations, sometimes you need a full graphical desktop experience to remotely control your Raspberry Pi. This is where Virtual Network Computing (VNC) comes into play. VNC allows you to see and interact with your Raspberry Pi's desktop environment as if you were sitting right in front of it, using a mouse and keyboard. Solutions like VNC have long been the best way to access any computer remotely on the same network, and VNC Connect, in particular, offers a robust and user-friendly experience.
Raspberry Pi's take on remote desktop connections is robust, and we'll take you through setting up your Raspberry Pi 4, 5, or 400 for remote access from across the globe using VNC. This method is incredibly useful for tasks that require a visual interface, such as browsing the web, using graphical applications, or developing projects that rely on visual feedback.
Setting Up VNC Connect for Your Raspberry Pi
RealVNC provides VNC Connect, which is highly recommended for Raspberry Pi users due to its integration and ease of use. Here's how to set it up:
- Install VNC Server on your Raspberry Pi:
If you're using Raspberry Pi OS with a desktop environment, VNC Server might already be pre-installed. If not, or if you're using a Lite version and want to add a desktop, open a terminal on your Pi and run:
sudo apt update sudo apt install realvnc-vnc-server realvnc-vnc-viewerAfter installation, enable VNC Server:
sudo raspi-configNavigate to 'Interface Options' > 'VNC' > 'Yes' to enable it. This will also start the VNC Server.
- Configure VNC Server:
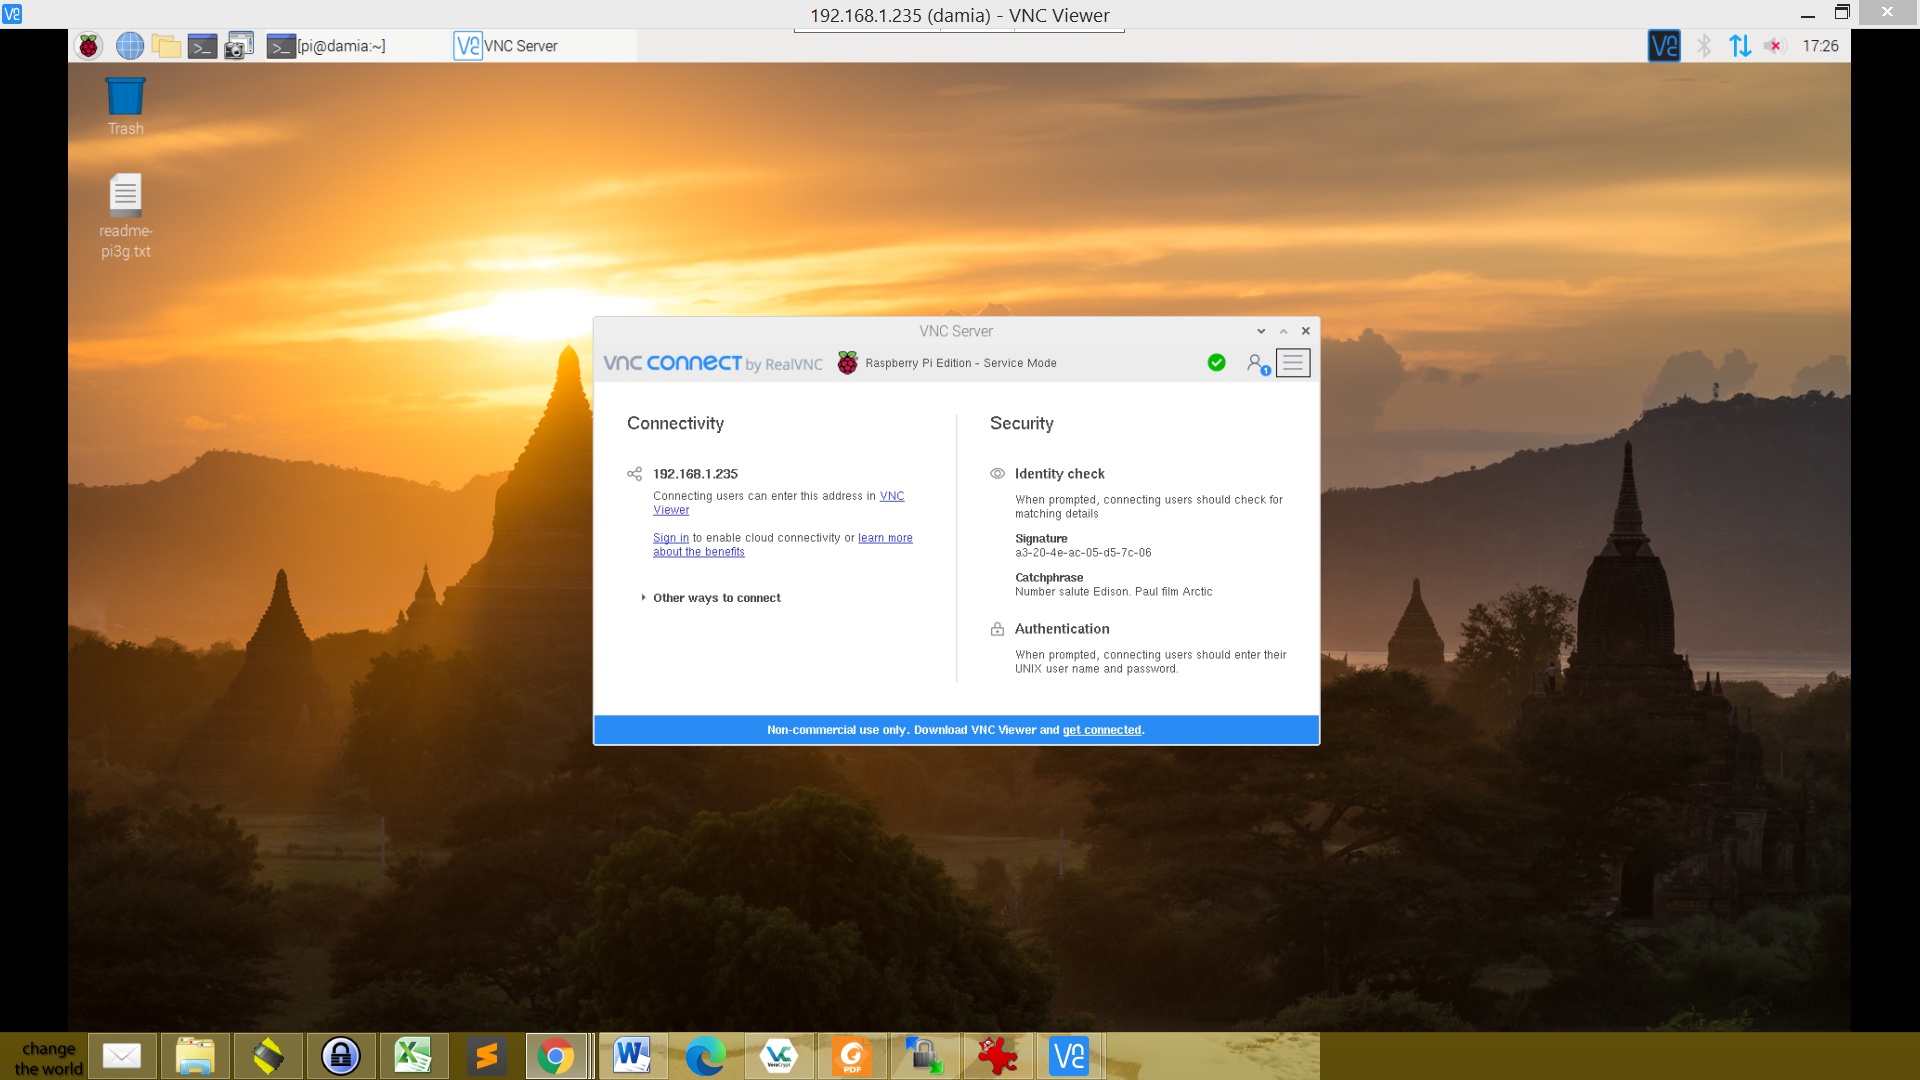
From the Raspberry Pi desktop, you should see a VNC icon in the top right corner. Click on it to open the VNC Server application. Here, you can configure settings like resolution, security (e.g., setting a password), and whether it starts automatically at boot.
For cloud connectivity (to access your Pi from anywhere in the world), you'll need to sign in with your RealVNC account. This is a super neat tool provided by the Raspberry Pi Foundation and RealVNC, allowing you to connect to your Raspberry Pi desktop and command line directly from any browser or VNC Viewer application.
- Download VNC Viewer on your Client Device:
On the computer, tablet, or smartphone you want to use for remote control, download the VNC Viewer application from RealVNC's official website (realvnc.com/connect/download/viewer). VNC Viewer is available for Windows, macOS, Linux, Android, and iOS, meaning you can remotely control your Raspberry Pi from a PC, Linux, or Mac computer, or even your phone.
- Connect to your Raspberry Pi:
- Local Network: Open VNC Viewer on your client device. In the address bar, enter your Raspberry Pi's local IP address (e.g., `192.168.1.100`) and press Enter. You'll be prompted for the VNC password you set up on your Pi.
- Global Access (via RealVNC Cloud): If you signed into your RealVNC account on your Pi's VNC Server, simply sign into the same account on your VNC Viewer. Your Raspberry Pi should appear in your list of accessible computers. Click on it to connect. This allows you to remotely log into your Raspberry Pi’s full operating system using VNC Connect from anywhere with an internet connection.
VNC provides a rich, interactive experience, making it ideal for graphical tasks and for users who prefer a visual interface. It truly helps master the art of remote control and unlock the full potential of your Raspberry Pi.
Method 3: Web-Based Control with Raspberry Pi Connect
A relatively new and incredibly convenient option for remote access is Raspberry Pi Connect. This service, provided by the Raspberry Pi Foundation, is designed to simplify remote control by allowing you to access your Raspberry Pi directly through a web browser. It's a secure remote access solution for Raspberry Pi OS, offering both desktop and command line access without the need for complex port forwarding or third-party software installations on your client device.
The Raspberry Pi Connect software allows you to control your Raspberry Pi remotely through a web browser, making it accessible from any device with an internet connection and a browser. This is particularly useful for those who want a quick, hassle-free way to check on their Pi or perform simple tasks without installing dedicated applications.
Here's how to get started with Raspberry Pi Connect:
- Ensure your Raspberry Pi OS is up to date:
Open a terminal on your Raspberry Pi and run:
sudo apt update sudo apt full-upgrade -yThis ensures you have the latest packages, including the necessary components for Raspberry Pi Connect.
- Install Raspberry Pi Connect (if not already present):
While newer versions of Raspberry Pi OS might include it, you can install it manually:
sudo apt install rpi-connect - Enable and Link Your Pi:
On your Raspberry Pi's desktop, look for the Raspberry Pi Connect icon (often in the system tray). Click it to open the setup wizard. You'll be prompted to sign in with your Raspberry Pi account (the same one you use for the Raspberry Pi website). Once signed in, your Pi will link to your account, making it discoverable via the web interface.
- Access from a Web Browser:
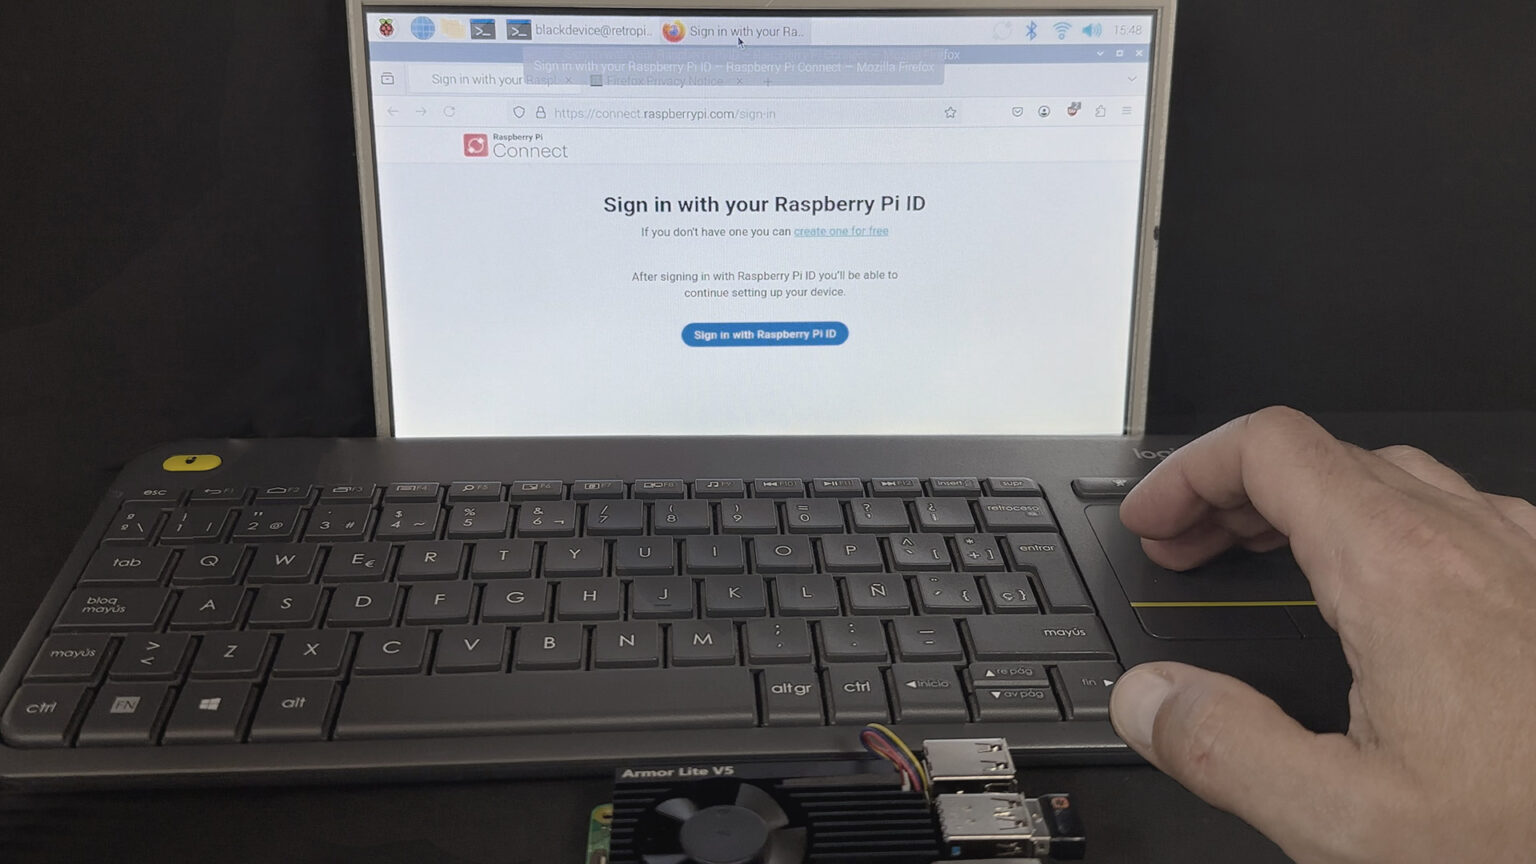
On your client device (PC, Mac, phone, etc.), open a web browser and go to connect.raspberrypi.com. Sign in with the same Raspberry Pi account you used to link your Pi. You should see your Raspberry Pi listed. Click on it to initiate a connection. You can choose to open a terminal session (command line) or a full desktop session, all within your web browser.
Raspberry Pi Connect is a super neat tool provided by the Raspberry Pi Foundation, simplifying remote access significantly. It handles the complexities of network traversal, making it easy to remotely control your Raspberry Pi from any device connected to the internet, without needing to configure your router for port forwarding or dynamic DNS.
Beyond the Local Network: Global Access Solutions
While SSH, VNC, and Raspberry Pi Connect offer excellent ways to control your Raspberry Pi, sometimes you need to access it from outside your local network – from a friend's house, a coffee shop, or another country. This requires a few extra configuration steps to make them work from anywhere, but it’s entirely doable. To remotely control your Raspberry Pi from any device connected to the internet, you can leverage several techniques. These methods essentially bridge the gap between your remote location and your home network, allowing your Pi to be accessible globally.
- Port Forwarding (for SSH/VNC): This is a common method where you configure your home router to direct incoming traffic on a specific port to your Raspberry Pi's local IP address. For example, you might forward external port 2222 to your Pi's internal port 22 (for SSH).
- Pros: Direct connection, potentially faster.
- Cons: Requires router access and configuration, can be a security risk if not done carefully (exposing ports to the internet), requires a static public IP or Dynamic DNS.
- Dynamic DNS (DDNS): If your home internet connection has a dynamic public IP address (which most residential connections do), your IP address changes periodically. DDNS services (like No-IP, DuckDNS, or FreeDNS) provide a hostname (e.g., `myrpi.ddns.net`) that automatically updates to point to your current public IP address. This allows you to connect to your Pi using a memorable hostname instead of a changing IP address.
- Pros: Solves the dynamic IP problem, easier to remember.
- Cons: Still requires port forwarding, relies on a third-party service.
- VPN (Virtual Private Network): Setting up a VPN server on your home network (e.g., on your router or another Raspberry Pi) allows you to create a secure tunnel back to your home network from anywhere. Once connected to the VPN, your remote device behaves as if it's on your home local network, allowing you to use local IP addresses for SSH and VNC.
- Pros: Highly secure, all traffic is encrypted, no need for individual port forwarding for each service.
- Cons: Requires VPN server setup, can add latency.
- Cloud-based Services / Remote Access Tools: Solutions like TeamViewer, VNC Connect (as discussed), or XRDP (another remote desktop protocol) can provide remote access to a Raspberry Pi over the internet by acting as intermediaries. They often handle the complexities of NAT traversal and firewalls, simplifying global access.
- Pros: Easy setup, often bypasses router configuration, reliable.
- Cons: May involve third-party servers, some services might have usage limits or subscription fees for advanced features. Raspberry Pi Connect is a prime example of a simplified, official cloud-based solution.
When considering global access, security is paramount. Exposing your Raspberry Pi directly to the internet through port forwarding carries risks. Always use strong, unique passwords, consider SSH key-based authentication instead of passwords, and keep your software updated. Remotely control your Raspberry Pi via SSH from an external network is a powerful capability, but it demands careful attention to security best practices.
Advanced Considerations and Best Practices
As you delve deeper into controlling your Raspberry Pi remotely, there are several advanced considerations and best practices that can significantly enhance your experience, improve security, and ensure long-term stability. These tips go beyond the basic setup and are crucial for anyone who relies on their Raspberry Pi for critical projects or continuous operation.
- Security First: Strong Passwords and SSH Keys:
The default username (`pi`) and password (`raspberry`) are widely known. Change them immediately! For SSH, consider using SSH key-based authentication instead of passwords. This involves generating a pair of cryptographic keys (a public key on your Pi, a private key on your client device). It's far more secure than passwords, as it's nearly impossible to guess and immune to brute-force attacks. You can also disable password authentication for SSH entirely once SSH keys are set up.
- Keep Your Software Updated:
Remember to keep your Raspberry Pi’s operating system and remote access tools updated to prevent compatibility issues and security vulnerabilities. Regularly run `sudo apt update` and `sudo apt full-upgrade` on your Pi. This ensures you have the latest security patches and bug fixes, protecting your Pi from known exploits.
- Firewall Configuration:
Implement a firewall on your Raspberry Pi using `ufw` (Uncomplicated Firewall) to restrict incoming connections only to necessary ports (e.g., 22 for SSH, 5900 for VNC). This adds an extra layer of security, blocking unwanted access attempts.
- Monitor Your Pi:
For critical applications, consider setting up monitoring tools (e.g., Netdata, Grafana with Prometheus) to keep an eye on your Pi's performance, temperature, and resource usage. This allows you to proactively address issues before they impact your remote control capabilities or project functionality.
- Automate Tasks:
Leverage SSH to automate tasks on your Pi. You can write shell scripts to perform routine maintenance, data collection, or project-specific actions, and then trigger them remotely via SSH. This is particularly powerful for IoT devices or servers that need consistent management.
- Backup Your Data:
Regularly back up your Raspberry Pi's SD card or critical project files. Remote access can sometimes lead to accidental deletions or misconfigurations. Having a recent backup ensures you can quickly recover from any unforeseen issues.
- Consider a UPS (Uninterruptible Power Supply):
For remote Pis, especially those in critical roles, a small UPS can protect against power outages and ensure your Pi remains accessible even during brief power interruptions, preventing data corruption and downtime.
- Mobile Access:
Controlling your Raspberry Pi from your phone opens up a world of possibilities for remote project management and IoT applications. Utilize mobile SSH clients (like Termius or JuiceSSH) and VNC Viewer apps for on-the-go management.

How to Shut Down a Raspberry Pi Remotely
Connect to your Raspberry Pi remotely with Raspberry Pi Connect
Control your Raspberry Pi Remotely | PiCockpit
